

Before You Begin:
Make sure that you have all the necessary supplies and tools ready and within reach. This will make your candle-making experience smooth and enjoyable!
Step 1: Melting the Wax:
Open your wax bag and place it in the microwave. Do your best to ensure the bag is standing upright. If your bag has a bit of a rebellious streak and refuses to stand straight in your microwave, don't worry! Just give it a gentle fold while keeping it open. Now, microwave the wax for approximately 3 minutes or until the wax transforms into a delightful pool of liquid.
Stovetop Alternative:
If you're more of a stove-top kind of person, you can also melt the wax using a small pot. Fill the pot with about 2 inches of water and place the open wax bag upright in the pot. Heat it over low heat, keeping a watchful eye to prevent the bag from toppling over. Stir occasionally, until the wax is completely liquefied.


Step 2: Setting the Wicks:
Grab your candle wicks and lovingly place them in the center of your vessels, using the wick stickers provided. To make sure the wicks are perfectly centered, employ the wick centering tools to adjust and secure them.
Grab your candle wicks and lovingly place them in the center of your vessels, using the wick stickers provided. To make sure the wicks are perfectly centered, employ the wick centering tools to adjust and secure them.


*Caution:*
Be extra careful when removing the wax bag from the microwave or pot as the contents will be hot.

Step 3: Adding the Fragrance:
Now, for the part that makes your candles truly special: the fragrance. Pour all of the fragrance oil into the wax bag and stir it for 30 seconds. This will infuse the wax with the lovely aroma of your chosen fragrance.
Now, for the part that makes your candles truly special: the fragrance. Pour all of the fragrance oil into the wax bag and stir it for 30 seconds. This will infuse the wax with the lovely aroma of your chosen fragrance.


Step 4: Pouring the Mixture:
Slowly and carefully pour the fragrant wax mixture into the two tins you've set aside. To make this step a little easier, consider cutting off approximately 3 to 4 inches at the top of your wax bag.
Slowly and carefully pour the fragrant wax mixture into the two tins you've set aside. To make this step a little easier, consider cutting off approximately 3 to 4 inches at the top of your wax bag.


Step 5: Letting the Candles Set:
Next, place your freshly poured candles on a flat surface and let them rest for at least 24 hours. For the best experience (we're talking about optimal fragrance diffusion here), let your candles sit undisturbed for a minimum of 3 days, or even up to 2 weeks before use. Trust us, it'll be worth the wait!
Next, place your freshly poured candles on a flat surface and let them rest for at least 24 hours. For the best experience (we're talking about optimal fragrance diffusion here), let your candles sit undisturbed for a minimum of 3 days, or even up to 2 weeks before use. Trust us, it'll be worth the wait!
Step 6: Making the Second Batch:
Now that you're a pro, repeat the steps above with the second bag of wax and another fragrance.
Now that you're a pro, repeat the steps above with the second bag of wax and another fragrance.
Step 7: Maintaining Your Candle:
Before you light up your masterpiece, remember to trim the wicks to 1/4” above the wax. This will ensure a clean, even burn every time you use your candle.
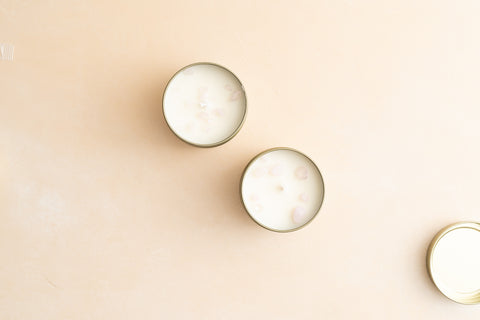
Optional Step: Adding a Personal Touch:
Feel like making your candles even more unique? Decorate them with crystals! Carefully remelt the top layer of the candle using a heat gun or a hairdryer, and then place the crystals on top.
There you have it! A friendly and detailed guide to creating your very own scented candles. Enjoy this creative journey and the calming ambiance your homemade candles will bring!
Before you light up your masterpiece, remember to trim the wicks to 1/4” above the wax. This will ensure a clean, even burn every time you use your candle.
Optional Step: Adding a Personal Touch:
Feel like making your candles even more unique? Decorate them with crystals! Carefully remelt the top layer of the candle using a heat gun or a hairdryer, and then place the crystals on top.
There you have it! A friendly and detailed guide to creating your very own scented candles. Enjoy this creative journey and the calming ambiance your homemade candles will bring!
urban kangaroo, candle crystal, crystal candle, crystal in candles, bath bomb kit, bath bombs kits. bath bomb kits, bath bombs kit, candle diys